
Thinking about upgrading your kitchen cabinets but unsure whether to go the DIY route or hire a professional? Cabinet installation can be a rewarding project, but it comes with its own set of challenges. While DIY may save you money and give you a sense of accomplishment, it also requires time, tools, and skill. On the other hand, hiring a pro ensures precision and efficiency but at a higher cost. Knowing the pros and cons of each option, The Noble Home Pros walk through the process to help you decide what’s best for your situation.
DIY Cabinet Installation
Installing cabinets can be an exciting project for homeowners looking to enhance the functionality and aesthetics of their kitchens, bathrooms, or other areas. A DIY cabinet installation not only gives you the chance to save money but also allows you to customize your home to meet your personal style and needs. However, before diving into this project, it’s important to understand the process and the challenges you might face. This guide will walk you through the essentials of DIY cabinet installation and provide insights to ensure the job is done right.
1: Preparing for Cabinet Installation
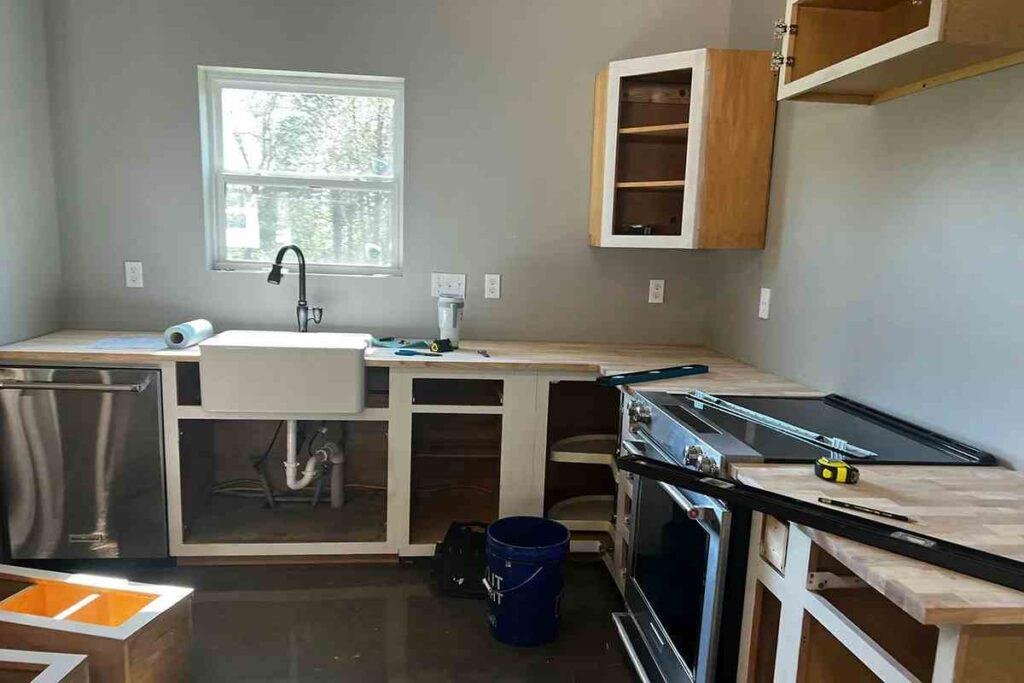
The first step in any DIY cabinet installation is preparation. Begin by measuring the space where you plan to install the cabinets. Accurate measurements are critical for ensuring the cabinets fit correctly and align properly with countertops, appliances, and walls. Be sure to measure both height and width while accounting for any uneven surfaces or obstructions like plumbing or electrical outlets.
Next, gather all necessary tools and materials. These typically include a level, tape measure, drill, screws, cabinet mounting brackets, stud finder, and shims. Depending on the scope of the project, you might also need a saw for cutting any custom pieces. Having all the tools ready will save time and ensure you don’t need to pause during installation.
It’s also a good idea to familiarize yourself with the manufacturer’s instructions. Different types of cabinets may have specific installation guidelines, and following these can prevent mistakes that could affect the longevity or stability of your cabinets.
2: Assembling the Cabinets
Many cabinet systems come in flat-pack form, meaning you will need to assemble them before installation. Begin by laying out all of the pieces and identifying which ones belong to specific cabinets. Take your time with assembly—rushing through this step can lead to issues later on. If you’re dealing with pre-assembled cabinets, you can skip this step, but it’s still important to inspect each unit for damage or defects before proceeding.
While assembling the cabinets, make sure to keep screws and hardware organized. Missing a piece of hardware mid-installation can be frustrating, and it can delay the project. Depending on the size of the cabinets, having an extra set of hands can be helpful during the assembly process. Once assembled, double-check that each cabinet is level and square.
3: Installing the Upper Cabinets
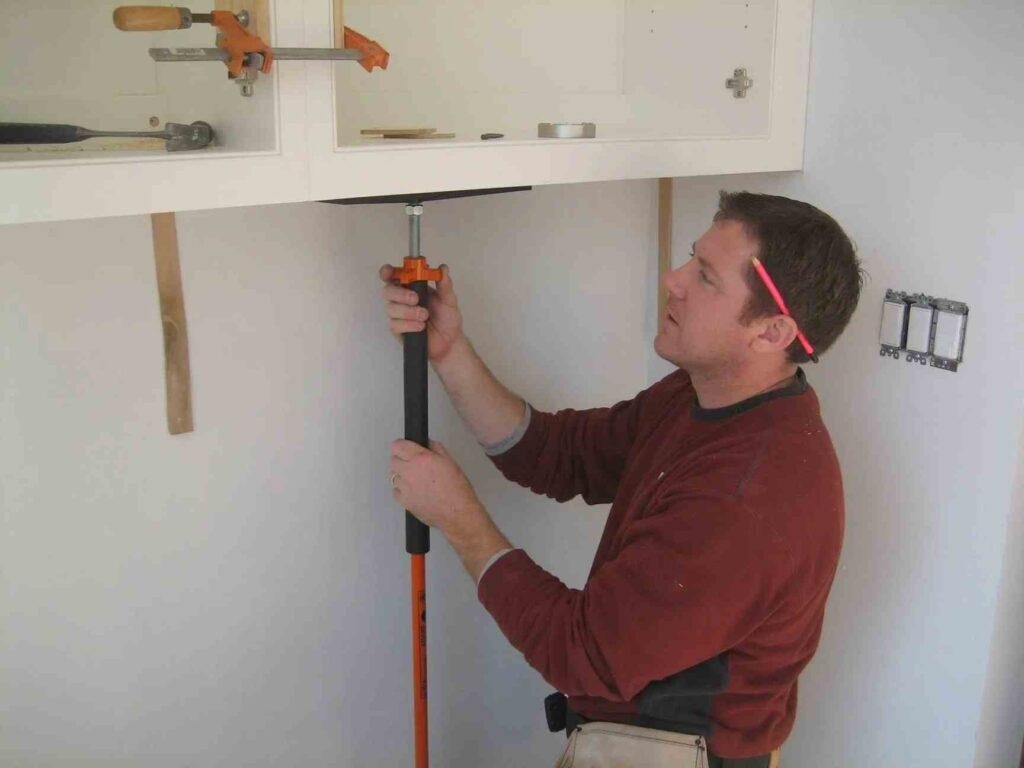
It’s usually recommended to install the upper cabinets first, as it gives you more space to work and avoids the risk of damaging the lower cabinets while working above them. Start by marking a level line on the wall where the bottom of the upper cabinets will sit. This ensures that the cabinets will hang straight. Next, use a stud finder to locate the wall studs—these will provide the necessary support for the weight of the cabinets.
Position the first cabinet on the wall, using a level to ensure it’s straight, and secure it into the studs with screws. It’s important to use screws long enough to anchor the cabinets into the studs for stability. Once the first cabinet is mounted, move on to the adjacent cabinets. Use clamps to hold them in place while you screw them together. This ensures the cabinets remain aligned and there are no gaps between units. Continue this process until all upper cabinets are securely fastened to the wall.
4: Installing the Lower Cabinets
After the upper cabinets are in place, you can move on to the lower cabinets. Begin by positioning the corner cabinet first. Like with the upper cabinets, use a level to ensure the cabinets sit straight. If the floor is uneven, you may need to use shims to adjust the height. It’s critical that the lower cabinets are level because the countertops will sit on top, and an uneven base can lead to problems later.
Once the corner cabinet is level and secure, move on to the adjacent cabinets, repeating the leveling process and securing each one to the wall studs. Be mindful of plumbing or electrical components that might need to be accommodated during this step.
5: Adjusting and Securing the Cabinets
Once all the cabinets are mounted, it’s time to make any necessary adjustments to ensure everything is level and aligned. This may involve fine-tuning the placement of shims or adjusting cabinet doors for a snug fit. Most modern cabinets come with adjustable hinges, allowing you to correct any gaps or misalignments after installation.
Take the time to inspect the entire installation for any signs of instability. Make sure all screws are tight, and the cabinets are securely fastened to the wall studs. This step is crucial to ensure the safety and durability of your installation.
6: Finishing Touches
With the cabinets installed, the final step is adding finishing touches. This typically involves installing cabinet hardware, such as handles or knobs, and applying caulk around the edges to create a seamless look. If you’ve installed upper cabinets, you might also want to add crown molding or trim to give the cabinets a polished, professional appearance.
Lastly, take a moment to clean up the workspace and ensure all tools and debris are cleared. With everything in place, your new cabinets are ready for use, providing a functional and stylish upgrade to your space.
Professional Cabinet Installation
Hiring a professional to install cabinets can offer homeowners a stress-free and efficient way to upgrade their kitchens, bathrooms, or other spaces. Professional installation ensures precision, quality, and a quicker completion time compared to DIY projects. While it comes at a higher cost, many homeowners find the investment worth it due to the expertise and peace of mind provided. This guide explores the process and benefits of professional cabinet installation, helping you understand what to expect and how it can enhance the overall value of your home.
1: Initial Consultation and Planning
The first step in professional cabinet installation is scheduling a consultation with a cabinet installer or contractor. During this initial meeting, you will discuss your vision for the space, including cabinet style, materials, layout, and any specific customization needs. The contractor will take accurate measurements of your space to ensure the cabinets fit perfectly and align with any countertops, appliances, or existing fixtures.
One advantage of hiring a professional is their experience in designing layouts that maximize space and functionality. They can suggest solutions to common problems, such as how to work around awkward corners or uneven walls. Once the plan is finalized, they will provide you with a detailed quote, including labor and material costs. This upfront planning ensures that there are no surprises or misunderstandings once the installation begins.
2: Cabinet Delivery and Pre-Installation Preparation
After the planning stage, your contractor will arrange for the cabinets to be ordered and delivered. Professional installers often work with trusted manufacturers or suppliers, ensuring the cabinets are of high quality and arrive in good condition. Once the cabinets arrive, the installation process can begin.
Before installation, the contractor will prepare the area by removing old cabinets (if applicable), making any necessary repairs to the walls or floors, and ensuring the space is clean and ready for the new cabinets. If electrical or plumbing work is needed, they will coordinate with other professionals to handle these aspects before starting the installation. This preparation ensures the installation process runs smoothly and without delays.
3: Installing the Upper Cabinets
In a professional installation, the upper cabinets are typically installed first. This allows the installers to work more efficiently and reduces the risk of damaging lower cabinets during the process. The contractor will use precise measurements and tools, such as levels and laser guides, to ensure the cabinets are hung straight and even.
Because professionals are experienced in cabinet installation, they know how to securely anchor the cabinets to the wall studs, ensuring they can hold the weight of dishes and other kitchen items over time. Additionally, professional installers are familiar with local building codes and regulations, so you can be confident that your cabinets will be installed in compliance with safety standards.
As each cabinet is installed, the contractor will check for alignment and make adjustments as needed. This ensures the cabinets not only look visually appealing but also function properly, with doors and drawers that open and close smoothly.
4: Installing the Lower Cabinets
Once the upper cabinets are in place, the focus shifts to installing the lower cabinets. The process is similar to the upper cabinets but requires additional care to ensure the cabinets are perfectly level, as countertops will rest on them. A professional installer will use shims to make minor adjustments for any unevenness in the floor, ensuring that the cabinets are stable and the countertops will sit flat.
Lower cabinets often need to accommodate plumbing or electrical fixtures, and a professional installer will have the expertise to make precise cuts or modifications to the cabinet structure. This prevents future issues with electrical work maintenance to ensure everything is installed neatly and securely.
5: Ensuring Quality and Precision
One of the key benefits of hiring a professional for cabinet installation is the attention to detail they bring to the project. After all cabinets are installed, the contractor will perform a thorough inspection to ensure everything is level, aligned, and securely fastened. They will make any necessary adjustments to the cabinet doors and drawers to ensure they open and close smoothly, with no gaps or misalignments.
Professionals also ensure that all hardware, such as hinges, knobs, and drawer pulls, are installed correctly. This level of precision not only improves the functionality of the cabinets but also enhances their appearance. Additionally, professional installers take the time to ensure the cabinets are securely mounted to the wall studs, ensuring long-term durability and safety.
6: Final Touches and Clean-Up
Once the cabinets are fully installed, the contractor will focus on the finishing touches. This may include installing molding or trim around the cabinets to give them a polished, custom look. Professionals will also apply caulking where necessary to seal gaps between the cabinets and walls, which not only improves aesthetics but also helps prevent moisture damage.
After the installation is complete, a professional installer will clean up the workspace, removing any debris or dust that may have accumulated during the process. Unlike DIY projects, where clean-up can sometimes be an afterthought, professionals ensure the space is left in excellent condition, ready for you to enjoy your new cabinets.
Conclusion
Whether you choose to tackle cabinet installation yourself or hire a professional depends on your priorities. DIY offers cost savings and personal satisfaction but can be time-consuming and challenging. A professional installer, though pricier, delivers expertise and a polished finish. Weighing these factors against your budget, timeline, and skill level will guide you toward the right choice. Ultimately, the best decision is the one that leaves you happy with your newly installed cabinets.